Create a blog with React and Sanity
Nikki Peel
Published on 2021-01-10
I recently decided to create a blog of my own where I could add technical posts, new projects, and list some of my favorite resources. After my initial sketches and creating wireframes in XD, I needed to decide on which language to build this blog with, what CMS (if any) I would use and where it would be deployed. I found this great tutorial on YouTube: Build a Portfolio Website with React and Sanity.io
This seemed like a good opportunity to get my blog up and running quickly with technologies I was already familiar with. I've built a few projects with React and Tailwind has been my CSS framework of choice for a while now. I found the tutorial very easy to follow along and well documented. I'd highly suggest visiting Sanity.io and their blog for more guides and project tutorials.
While I hope you find this post useful, I'd like to also encourage you to follow along with the original tutorial for more thorough details: Build Your First Blog with React and Sanity
Build the site using create-react-app
Open up a terminal and create your new site by running npx create-react-app in your project's folder followed by your new site's name (mine will be called portfolio in this project). Please make sure you first have NPM (Node Package Manager) installed on your local machine first.
npx create-react-app portfolio
Once your initial files are created, run the following command to get into your new site: cd portfolio
Finally, run npm start to view your site in your browser (this should run on localhost:3000)
Setting up Sanity
Now that the site is up and running with React, we need to connect it with Sanity. First, you need to install Sanity CLI globally:
npm i -g @sanity/cli
Next, we'll need to activate Sanity with our current project. I created a new folder in my site's directory to hold Sanity files named 'sanity-studio' and then ran the following command:
sanity init
You'll be asked to answer a list of questions related to your new Sanity project:
- Create new project - Hit Enter
- Your project name - You can name this whatever you'd like, I chose 'portfolio'
- Use the default dataset configuration? - Type 'Y' and hit Enter (the default dataset configuration has a public dataset named 'production')
- Project output path - This is the path where our Sanity project will live. It should read something like this: /sanity-studio/portfolio (your sanity folder and the name of this particular project). Hit Enter.
- Select project template - For this project, we'll choose the 'Blog' schema. Using the arrow keys, navigate to 'Blog' so that it is selected and Hit Enter.
Choosing 'Blog' should install the proper schemas needed for a blog project (schemas are content models created with Javascript that determine what sort of content we can upload via the Sanity studio (for example: Post, Author, Category, Project). If you'd like to learn to build these schemas manually, please visit the Sanity Docs or follow along with the video tutorial.
To start the Sanity studio (where you will add the blog/portfolio content), enter in to your sanity project by running cd sanity-studio
Start the development server by running sanity start
make sure this is a separate terminal, you still want to view your site from localhost:3000
Once it's done building you can visit your new Sanity studio at localhost:3333 🤩
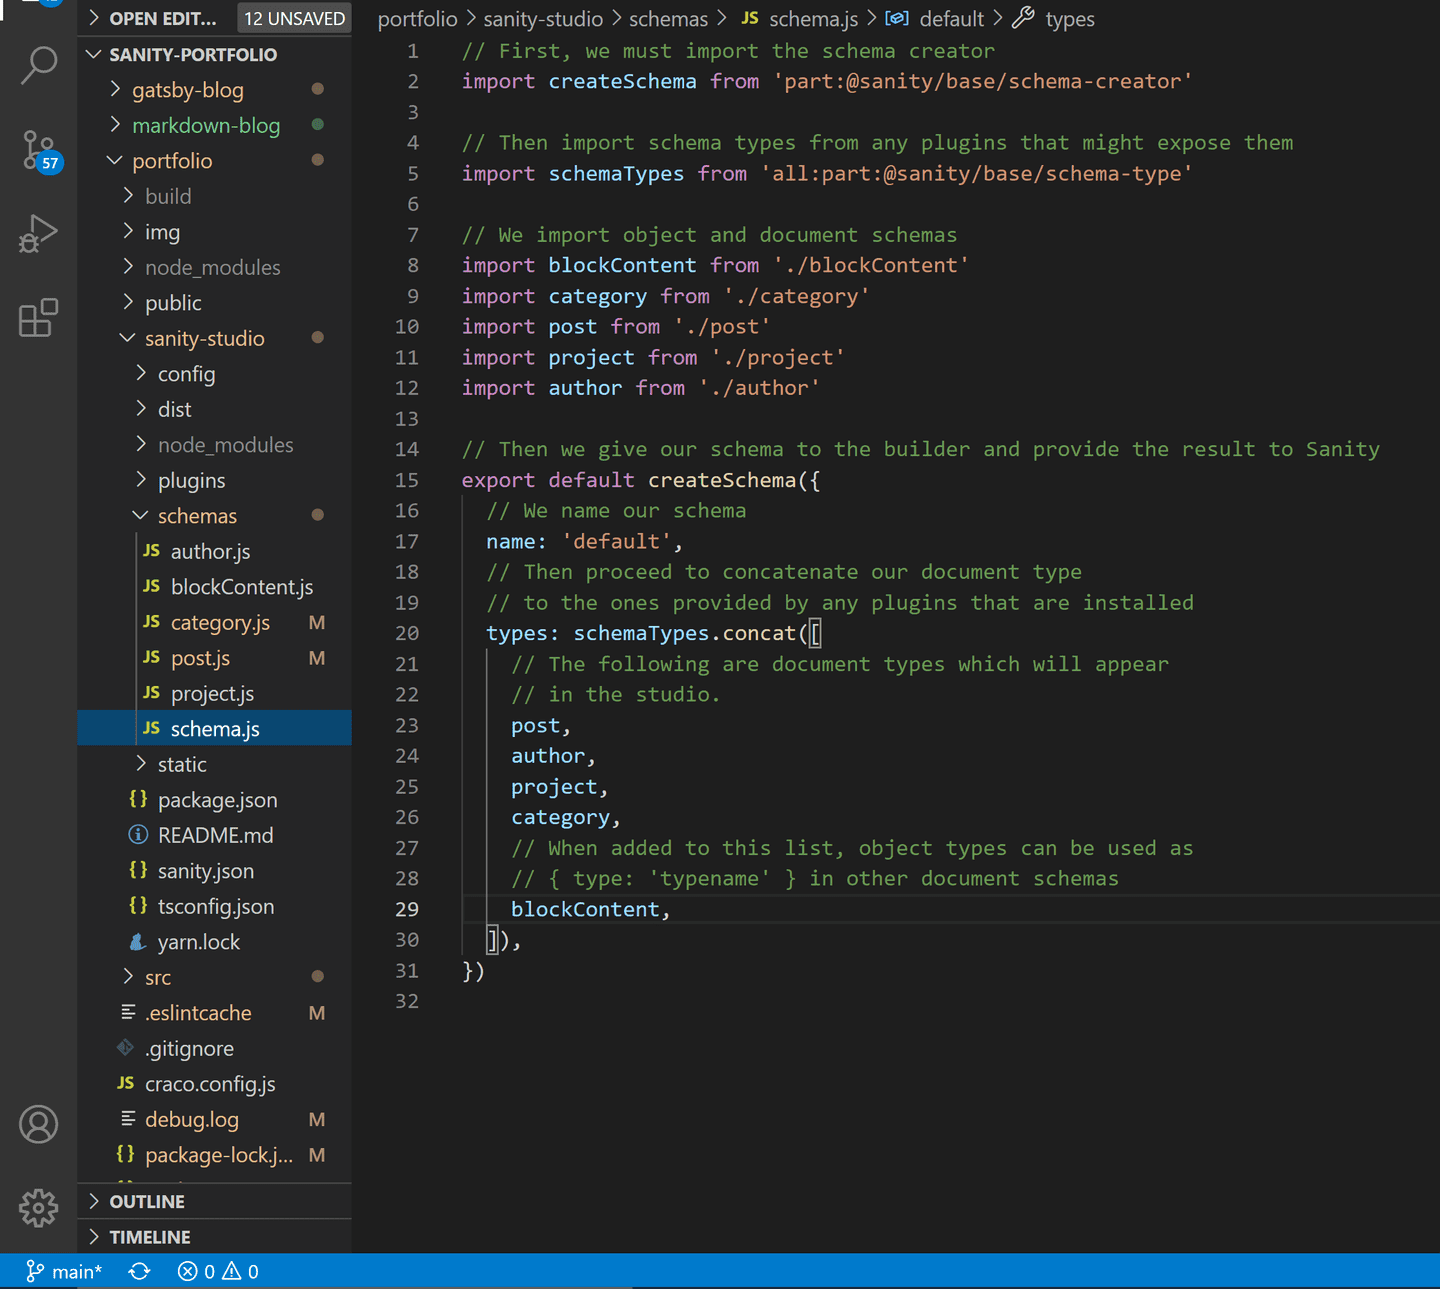
This is what my project structure looked like once the Sanity configuration files and schemas were created (schema.js joins together the various schemas we've written (Post, BlockContent, Project, Author, Category):
portfolio → sanity-studio → schemas → schema.js
This is what my Post schema looks like:
portfolio → sanity-studio → schemas → post.js
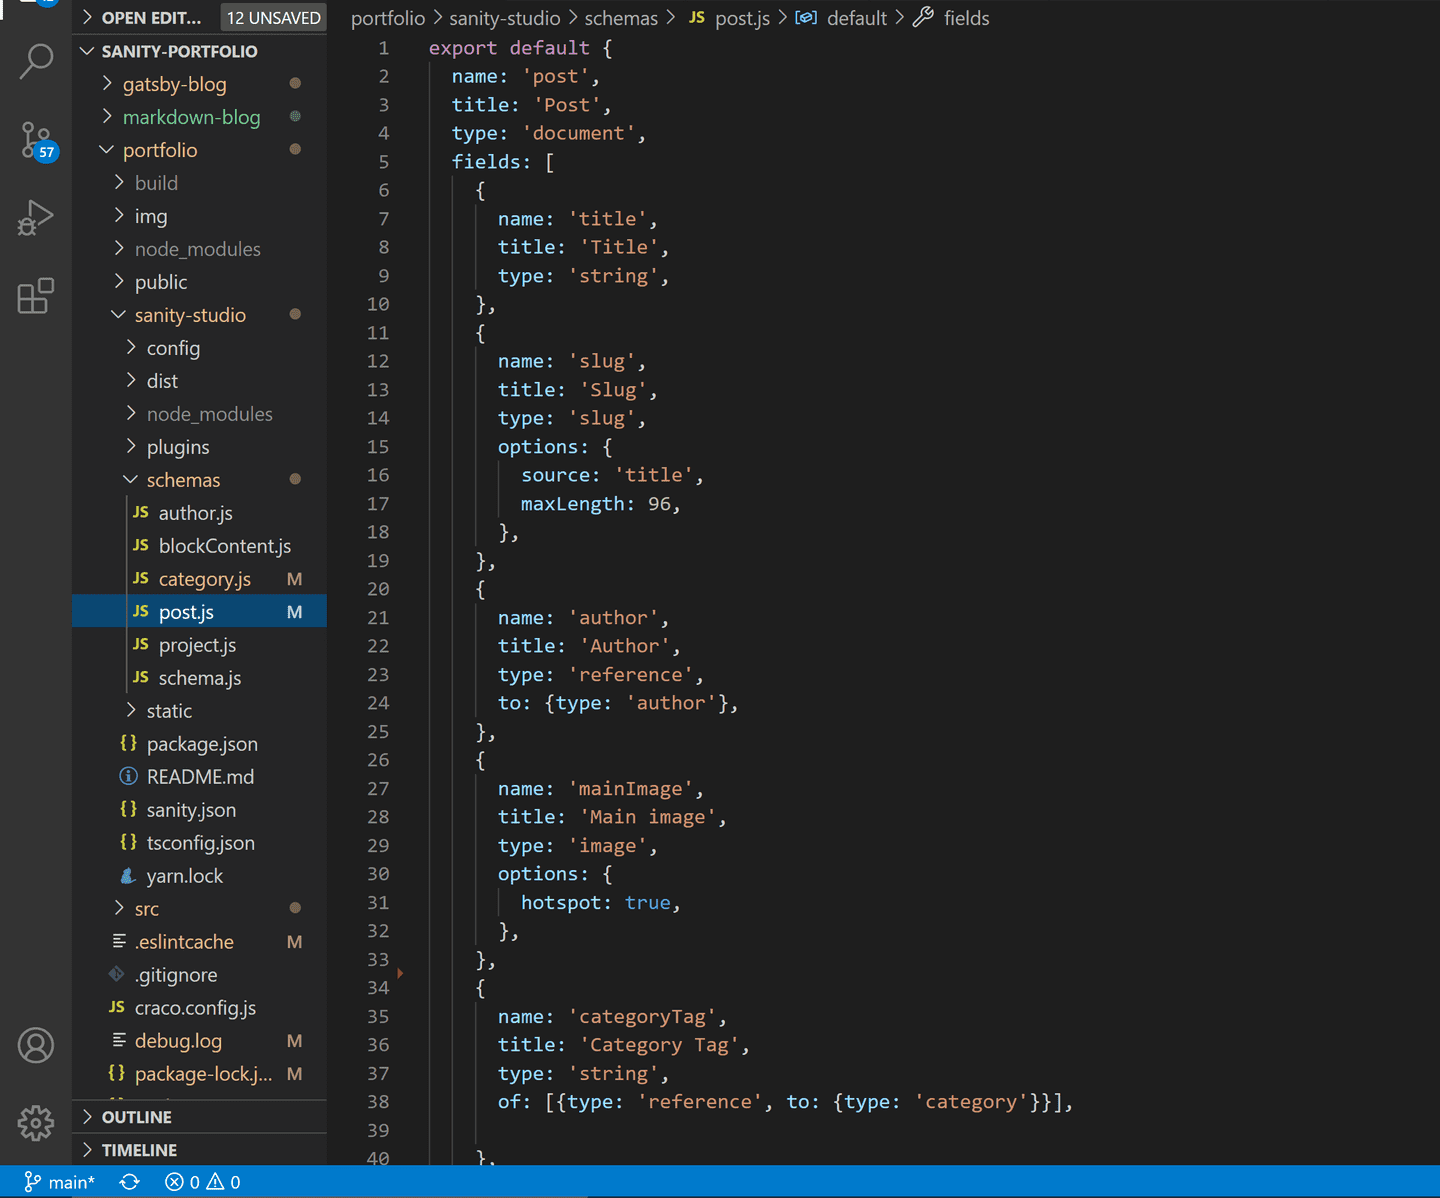
Update: I've since taken out the 'BlockContent' schema and replaced it with 'content'. I'll be using some code blocks in my blog and decided to use Sanity's Portable Text Editor instead (see docs).
In order for the code blocks to render, I had to add these lines of code to the SinglePost.js page within my components/ folder:
const serializers = {
  types: {
    code: props => (
      <pre data-language={props.node.language}>
        <code>{props.node.code}</code>
      </pre>
    )
  }
}
And then add the serializers within the content's container div:
<div className="break-words px-4 lg:px-16 py-12 lg:py-20 prose lg:prose-xl max-w-screen leading-normal">
  <BlockContent blocks={singlePost.body} projectId="0dzyqy4p" dataset="production" serializers={serializers}/>
</div>
Note: BlockContent is imported from the 'block-content-to-react' package for this file. To install this, you'll need to first run npm install @sanity/block-content-to-react
Adding content to your Sanity studio
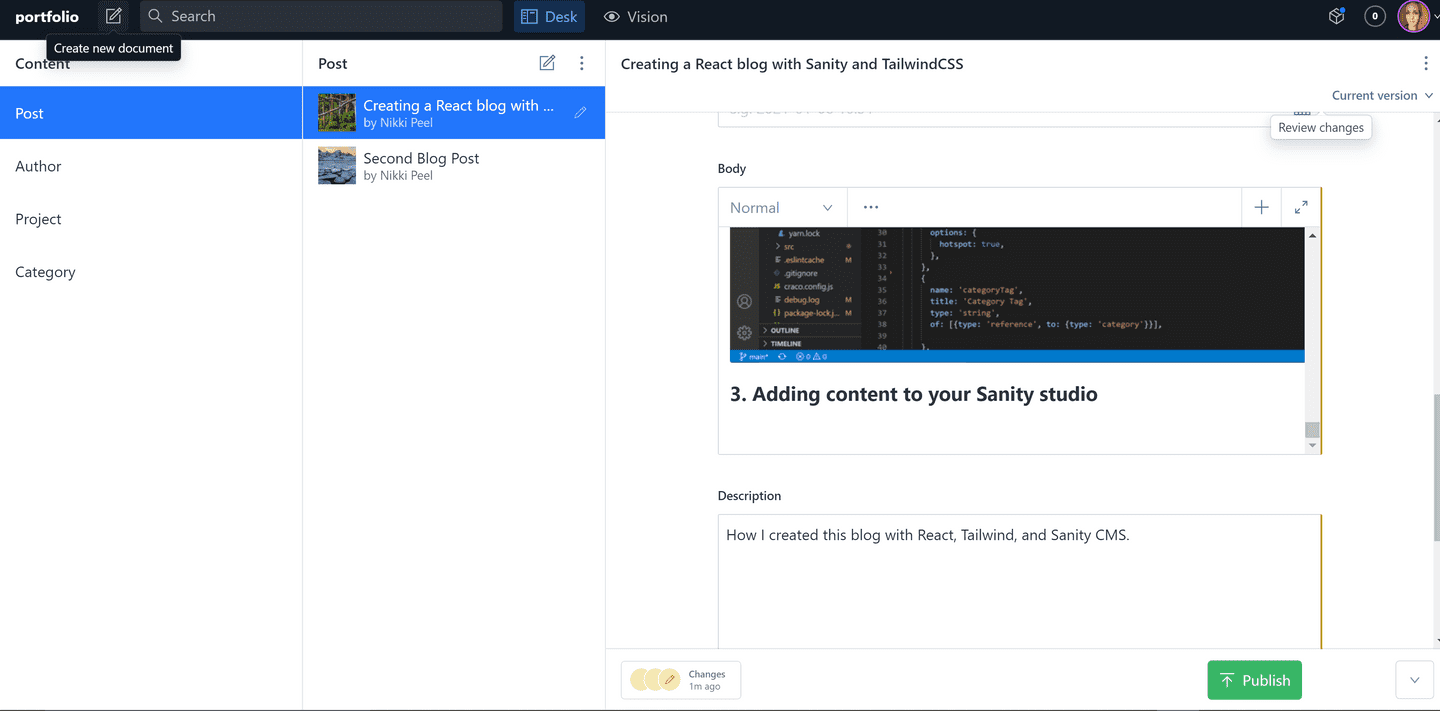
This next step involves adding actual content to our blog through the Sanity studio we just set up. As you can see, all of your content types are listed on the left-hand side of your studio. In order to add a new post to your blog, click the pencil icon in the top-left corner next to your project name and select your 'document type':
Connecting to our React app
Next, we need to connect our React app to the Sanity project. First, navigate into the main project's root folder and run: npm install @sanity/client
Once that's finished, navigate to your project's src/ folder and create a new file name 'client.js' (this is where we'll import the package we just installed). Navigate into that file and insert the following code:
import sanityClient from "@sanity/client";

export default sanityClient({
projectId: "Your Project ID Here", // find this at manage.sanity.io or in your sanity.json
dataset: "production", // this is from those question during 'sanity init'
useCdn: true,
});
From your Sanity dashboard, you'll also need to add localhost:3000 to your API settings. In your project's dashboard, navigate to 'Settings' and click on 'API'. Click where it says 'ADD NEW ORIGIN' and add 'http://localhost:3000' in that same dashboard view, we are going to want to add 'localhost:3000'.
You can also add localhost:3000 from the CLI by running sanity cors add http://locahost:3000 within your studio project
The React app and Sanity studio should now be connected 🎉👍
Building React components
Inside of your projects src/ folder, create a new folder named components/. This is where the global parts and pages of our project will be built. My components folder contains the following files:
Navbar.js and Footer.js - to be used globally Home.js - homepage About.js - about page Post.js - blog page, displays all posts SinglePost.js - single post page Project.js - projects page, displays all projects Tools.js - resources page
Setting up routing with React-Router
To use React-Router in your project, make sure to install the required dependency first: npm install --save react-router-dom
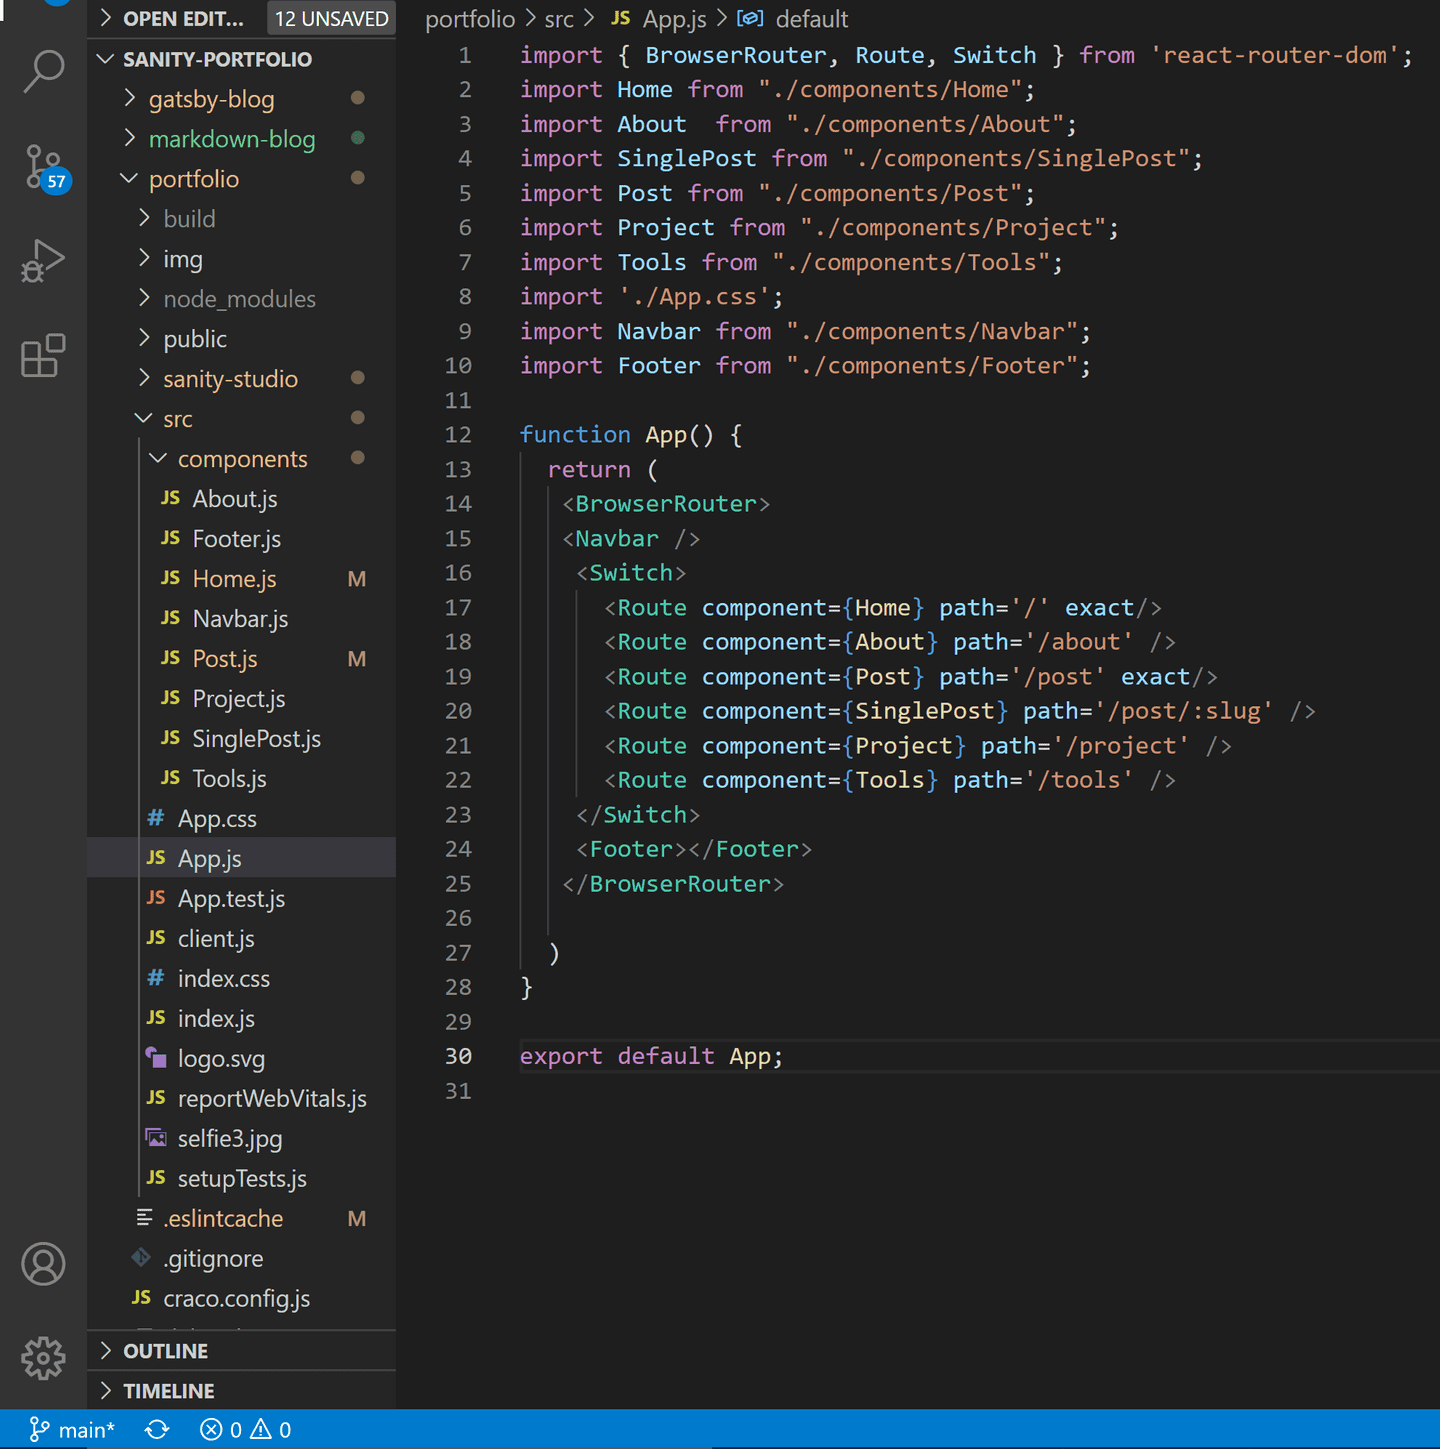
In your project's App.js, import all of the files you've just created in your project's components/ folder. You'll need to also install BrowserRouter, Route, and Switch from 'react-router-dom':
Displaying posts using GROQ
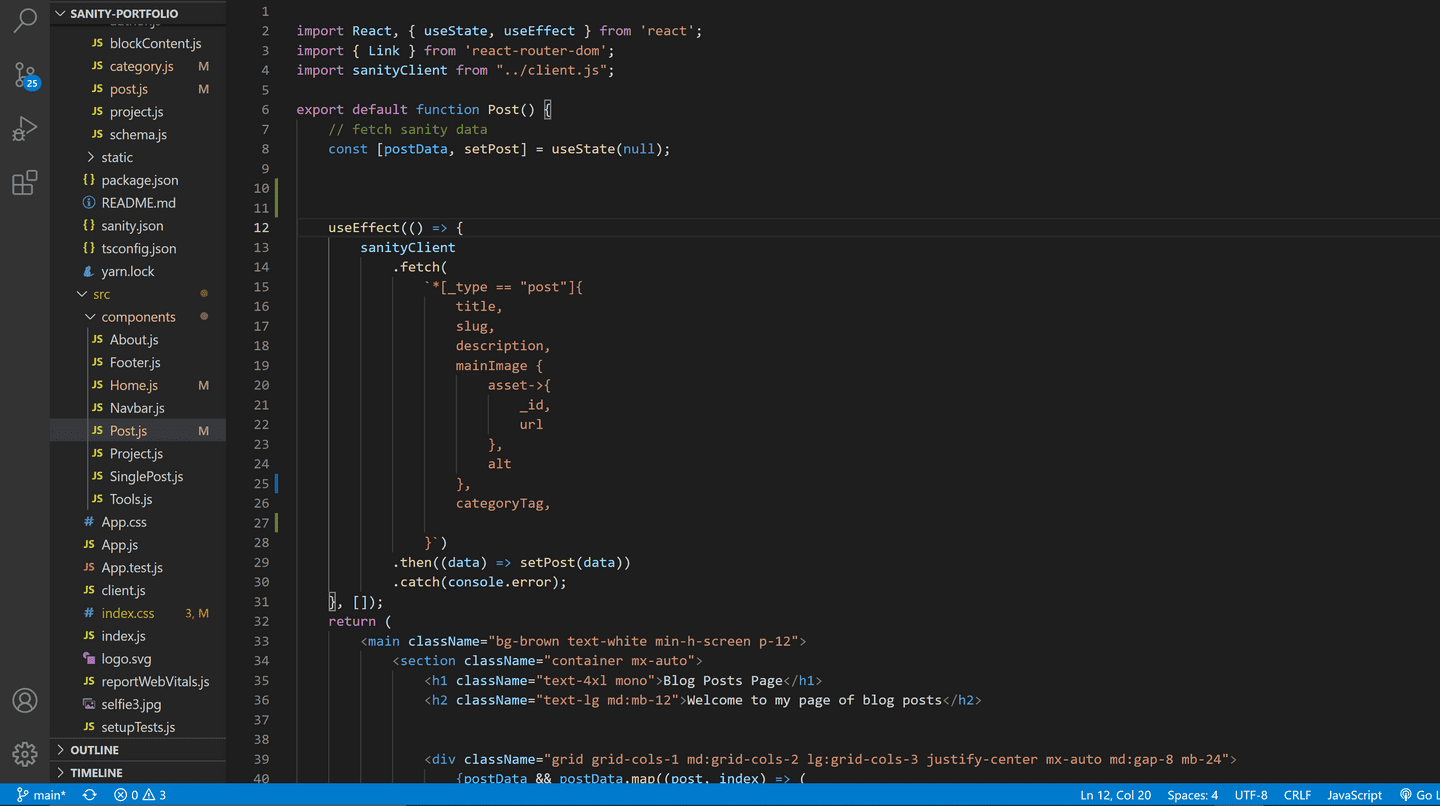
For each of your pages that will be using data from Sanity, be sure to import your Sanity client - client.js - along with 'useState' and 'useEffect' from 'react' (we'll be setting our state then fetching posts with useEffect and sanityClient). You should also import 'Link' from 'react-router-dom' for navigation to single posts. Here is what my final Post.js file looks like:
With Sanity, you can use either GROQ or GraphQL for your querying language. Since this was my first project with Sanity and the tutorial used GROQ, I decided to go with that for starting out. Within 'useEffect', we're fetching the title, slug, description, featured image, and category for each post:
useEffect(() => {
        sanityClient
            .fetch(
                `*[_type == "post"]{
                    title,
                    slug,
                    description,
                    mainImage {
                        asset->{
                            _id,
                            url
                        },
                        alt
                    },
                    categoryTag,

                }`)
            .then((data) => setPost(data))
            .catch(console.error);
    }, []);
Next, you can map over the blog posts within the return statement to display post's data like so:
{postData && postData.map((post, index) => (
                    <article>
                        <Link to={"/post/" + post.slug.current} key={post.slug.current}>
                        <span key={index}>
                            <img src={post.mainImage.asset.url} alt={post.mainImage.alt} />
                            <span>
                                <h3 >{post.title}</h3>
                            </span>
                            <div>
                                <p>{post.description}</p>
                                <span>{post.categoryTag}</span>
                            </div>
                        </span>
                        </Link>
                    </article>
                    ))}
Building the Single Post page
You'll want to install the following dependencies for your posts to display properly:
npm install @sanity/block-content-to-react @sanity/image-url
block-content-to-react: this will render an array of block text from Sanity with React (visit docs) image-url: this library helps with the image URL (visit docs) For single posts, our GROQ query looks like this:
src → components → SinglePost.js
useEffect(() => {
        sanityClient.fetch(`
            *[slug.current == "${slug}"]{
                title,
                _id,
                slug,
                mainImage{
                    asset->{
                        _id,
                        url
                    }
                },
                body,
                "name": author->name,
                "authorImage": author->image
            }`
        )
        .then((data) => setSinglePost(data[0]))
        .catch(console.error);
    }, [slug]);
SinglePost.js -
import React, {useEffect, useState} from 'react';
import { useParams } from 'react-router-dom';
import sanityClient from '../client.js';
import imageUrlBuilder from '@sanity/image-url';
import BlockContent from '@sanity/block-content-to-react';
import { FontAwesomeIcon } from '@fortawesome/react-fontawesome';
import { Link } from 'react-router-dom';
import { faChevronLeft } from '@fortawesome/free-solid-svg-icons';

const builder = imageUrlBuilder(sanityClient);
function urlFor(source) {
    return builder.image(source)
}

export default function SinglePost() {
    const [singlePost, setSinglePost] = useState(null); // initial state is null
    const { slug } = useParams();


    const serializers = {
        types: {
          code: props => (
            <pre data-language={props.node.language}>
              <code>{props.node.code}</code>
            </pre>
          )
        }
    }
    useEffect(() => {
        sanityClient.fetch(`
            *[slug.current == "${slug}"]{
                title,
                _id,
                slug,
                mainImage{
                    asset->{
                        _id,
                        url
                    }
                },
                body,
                "name": author->name,
                "authorImage": author->image
            }`
        )
        .then((data) => setSinglePost(data[0]))
        .catch(console.error);
    }, [slug]);

    if(!singlePost) return <div>Loading...</div>

    return (
        <main>
            <Link to="/post/"><FontAwesomeIcon icon={faChevronLeft} </FontAwesomeIcon> Back to Blog</Link>
            <article>
                <header>
                    <div>
                        <div>
                            <h1>
                                {singlePost.title}
                            </h1>
                            <div>
                                <img src={urlFor(singlePost.authorImage).url()} alt={singlePost.name} />
                                <p >{singlePost.name}</p>
                            </div>
                        </div>
                    </div>
                    <img src={singlePost.mainImage.asset.url} alt={singlePost.title} />
                </header>
                <div>
                    <BlockContent blocks={singlePost.body} projectId="0dzyqy4p" dataset="production" serializers={serializers}/>
                </div>
            </article>
        </main>
    )};
A few notes on this file:
- At the top, all of the required dependencies and files for Sanity and React are imported (I used FontAwesome for icons on this site so that was imported as well)
- A function is written urlFor to be used for finding the post's images and is used within the return statement State is set
- useParams is a React hook from the 'react-router-dom' package that is used to grab the parameters set in Sanity studio for the single post's slug (url)
- Data from sanityClient is fetched through a GROQ query within useEffect
- BlockContent is used to return the single post's body (text and images)
Styling with TailwindCSS
I love using Tailwind and prefer to write my styles inline with utility classes, but you can use any framework or styling for the blog. Tailwind supports many different methods of installation, since I used create-react-app to build this site I had to run the following:
npm install tailwindcss@npm:@tailwindcss/postcss7-compat @tailwindcss/postcss7-compat postcss@^7 autoprefixer@^9
Note: create-react-app doesn't support PostCSS8 yet, so I also had to install and configure an additional package:
npm install @craco/craco
After installing craco, replace react-scripts in your package.json with craco:
{
    "scripts": {
     "start": "craco start",
     "build": "craco build",
     "test": "craco test",
      "eject": "react-scripts eject"
    },
}
Next, create a file called craco.config.js and require autoprefixer and tailwind:
module.exports = {
  style: {
    postcss: {
      plugins: [
        require('tailwindcss'),
        require('autoprefixer'),
      ],
    },
  },
}
While still within your project's root folder, create a Tailwind config file by running npx tailwind init in your terminal. This will generate a basic file which you can use to customize your styles (see TailwindCSS configuration docs)
Installing Tailwind with create-react-app
I won't get into the details of using Tailwind in this post, but I'd highly suggest checking out the documentation for the framework. Here is what the styled sections of my blog and single post pages look like when complete:
SinglePost.js →
import React, {useEffect, useState} from 'react';
import { useParams } from 'react-router-dom';
import sanityClient from '../client.js';
import imageUrlBuilder from '@sanity/image-url';
import BlockContent from '@sanity/block-content-to-react';
import { FontAwesomeIcon } from '@fortawesome/react-fontawesome';
import { Link } from 'react-router-dom';
import { faChevronLeft } from '@fortawesome/free-solid-svg-icons';

const builder = imageUrlBuilder(sanityClient);
function urlFor(source) {
    return builder.image(source)
}

export default function SinglePost() {
    const [singlePost, setSinglePost] = useState(null); // initial state is null
    const { slug } = useParams();


    const serializers = {
        types: {
          code: props => (
            <pre data-language={props.node.language}>
              <code>{props.node.code}</code>
            </pre>
          )
        }
    }
    useEffect(() => {
        sanityClient.fetch(`
            *[slug.current == "${slug}"]{
                title,
                _id,
                slug,
                publishedAt,
                mainImage{
                    asset->{
                        _id,
                        url
                    }
                },
                body,
                "name": author->name,
                "authorImage": author->image
            }`
        )
        .then((data) => setSinglePost(data[0]))
        .catch(console.error);
    }, [slug]);

    if(!singlePost) return <div>Loading...</div>

    return (
        <main className="container bg-brown min-h-screen p-4 md:p-12">
            <Link to="/post/" exact className="text-white text-base items-center"><FontAwesomeIcon icon={faChevronLeft} className="mr-4"></FontAwesomeIcon> Back to Blog</Link>
            <article className="container text-white mx-auto rounded-lg mt-4">
                <header className="relative">
                    <div className="absolute h-full w-full flex items-center justify-center p-8">
                        <div className="bg-white text-brown bg-opacity-75 rounded p-4 md:p-12">
                            <h1 className="mono text-3xl mb-4">
                                {singlePost.title}
                            </h1>
                            <div className="flex justify-center text-brown">
                                <img src={urlFor(singlePost.authorImage).url()} alt={singlePost.name} className="w-10 h-10 rounded-full"/>
                                <p className="mono flex items-center pl-2 text-xl">{singlePost.name}</p>
                            </div>
                            <p className="text-base font-semibold mt-4 text-center">Published on <strong>{singlePost.publishedAt}</strong></p>
                        </div>
                    </div>
                    <img src={singlePost.mainImage.asset.url} alt={singlePost.title} className="w-full object-cover rounded-t" style={{ height: "400px"}}/>
                </header>
                <div className="break-words px-4 lg:px-16 py-12 lg:py-20 prose lg:prose-xl max-w-screen leading-normal">
                    <BlockContent blocks={singlePost.body} projectId="0dzyqy4p" dataset="production" serializers={serializers}/>
                </div>
            </article>
        </main>
    )};
Post.js →
import React, { useState, useEffect } from 'react';
import { Link } from 'react-router-dom';
import sanityClient from "../client.js";
export default function Post() {
// fetch sanity data
const [postData, setPost] = useState(null);
useEffect(() => {
sanityClient
.fetch(
`*[_type == "post"]{
title,
slug,
description,
mainImage {
asset->{
_id,
url
},
alt
},
categoryTag,
publishedAt,
}`)
.then((data) => setPost(data))
.catch(console.error);
}, []);
return (
<main className="bg-brown text-white min-h-screen p-12">
<section className="container mx-auto">
<h1 className="text-4xl mono">Blog Posts Page</h1>
<h2 className="text-lg mb-12">Welcome to my page of blog posts</h2>
<div className="grid grid-cols-1 md:grid-cols-2 lg:grid-cols-3 justify-center mx-auto md:gap-8 mb-24">
{postData && postData.map((post, index) => (
<article>
<Link to={"/post/" + post.slug.current} key={post.slug.current}>
<span className="block h-64 relative leading-snug" key={index}>
<img src={post.mainImage.asset.url} alt={post.mainImage.alt} className="w-full h-full object-cover absolute" id="main-img"/>
<span className="block relative h-full flex justify-start md:justify-end items-end pr-4 md:pb-4">
<h3 className="bg-gray-800 bg-opacity-75 text-white text-xl font-semibold px-3 py-4 rounded text-left">{post.title}</h3>
</span>
<div className="mt-4 mb-4">
<p className="text-base mb-4">{post.description}</p>
<span className="bg-mauve font-semibold text-sm py-2 px-4 mr-2 rounded">{post.categoryTag}</span>
<small className="text-base ml-2">📅 {post.publishedAt}</small>
</div>
</span>
</Link>
</article>
))}
</div>
</section>
</main>
)
}Deployment with Netlify
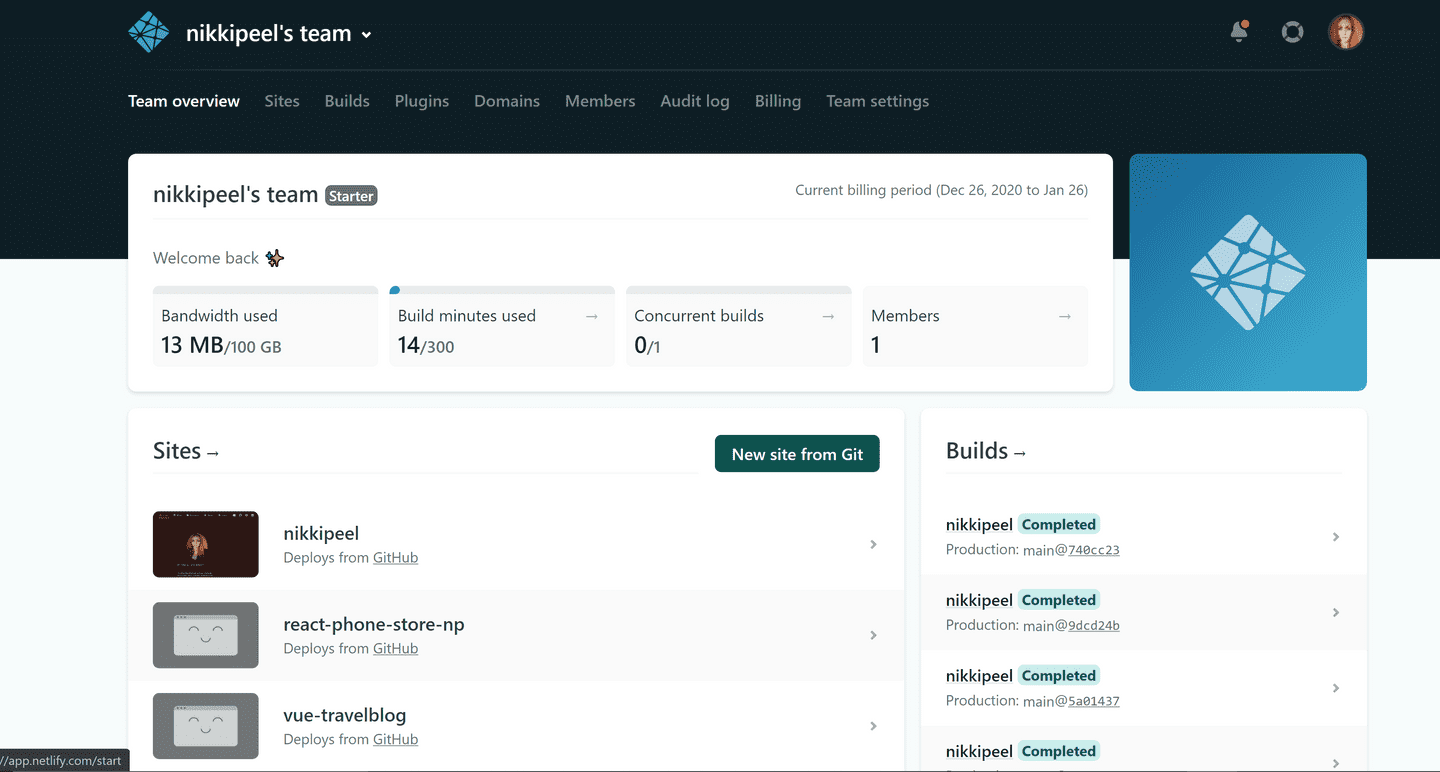
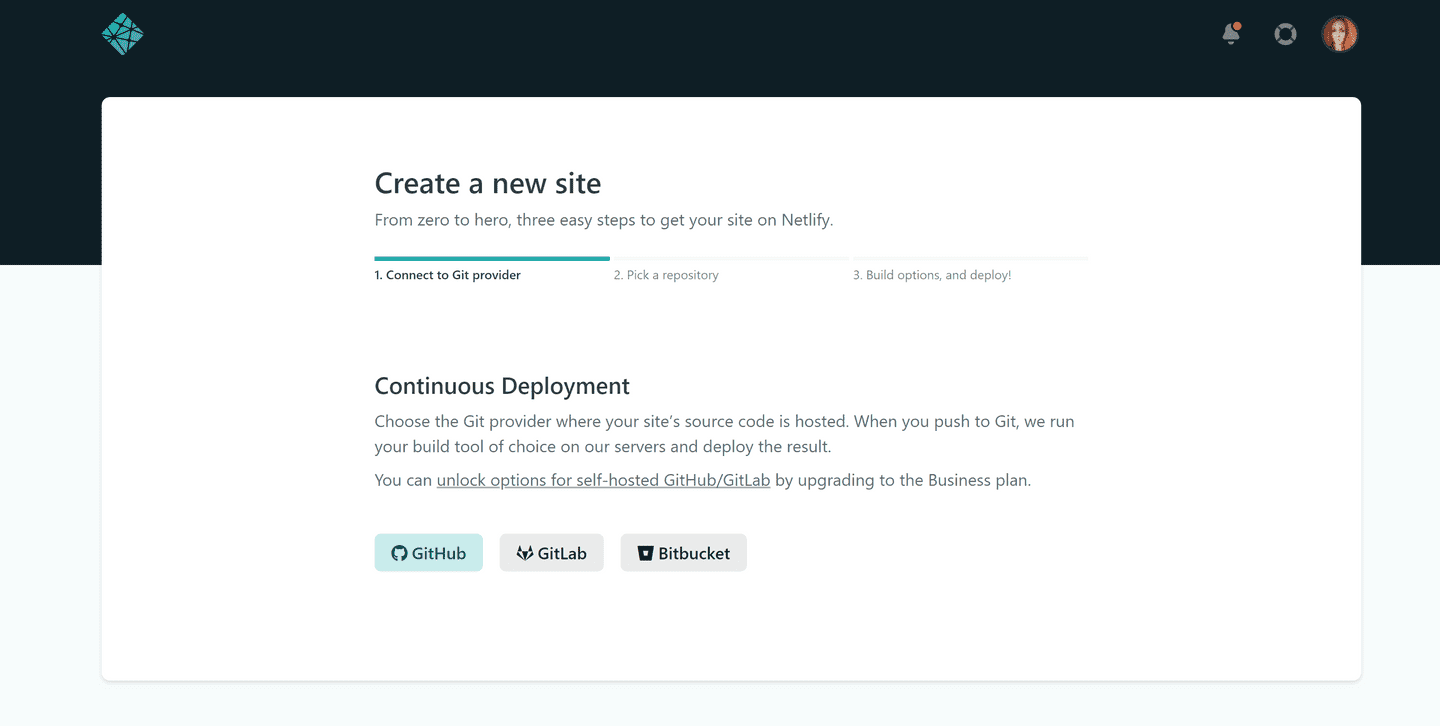
First, make sure you have an account with Netlify. Next, make sure your files are pushed to a repository on Github. In order to create a new site on Netlify, click on the button that says new site from git on your user dashboard.
You'll be prompted to deploy using Github, Gitlab, or Bitbucket. For this project, I connected it to Github (double check your repository's settings to make sure Netlify is integrated):
That's it! The blog is officially deployed. 🎉👍
Looking back on the project
The tutorial I followed for this website was excellent and I enjoyed creating this blog with Sanity. Sanity.io also has great documentation, a useful blog (with more tutorials) and there is even a Slack channel if you're interested in further support or to contribute yourself. From never having used Sanity as a CMS, I'm very pleased with the usability and final outcome.
Thank you so much for reading! 😊
.png)
.png)
